Classic Old Fashioned Bread and Butter Pickles are my answer to that moment when your fridge feels boring and your sandwich needs help. Maybe you bought too many cucumbers, or your garden decided to go wild all at once. Either way, this is the kind of recipe that makes you feel instantly capable, like you just stocked your own little country pantry. They are sweet, tangy, and super crunchy, with that old school deli vibe. And yes, they make burgers, hot dogs, and tuna salad taste like they came from your favorite diner. 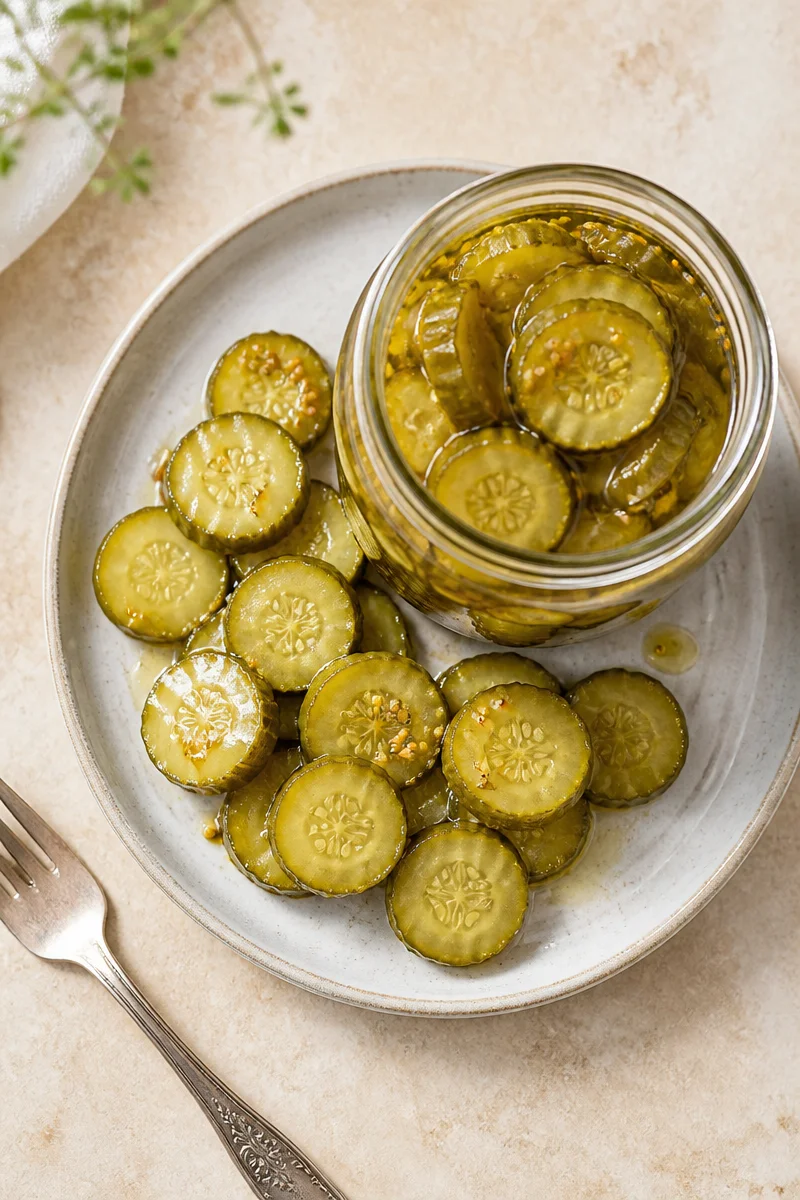
What You’ll Need
Before we get into the fun part, let’s round up the basics. I like laying everything out first because once you start, it goes pretty quickly. Also, you do not need fancy gear, but you do need clean jars and a little patience.
Ingredients and simple equipment
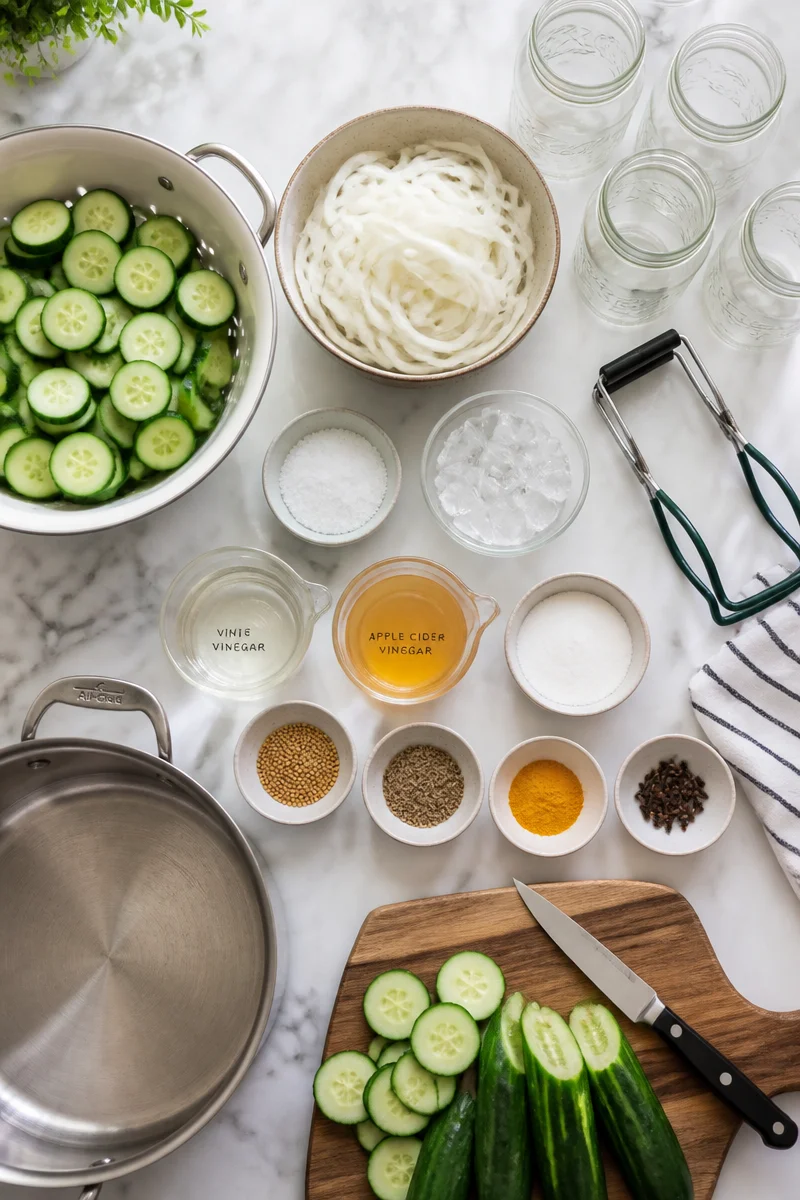
- Pickling cucumbers (about 4 to 5 pounds, sliced into coins)
- Onions (2 medium, thinly sliced)
- Kosher salt (1/4 cup, for the cucumber soak)
- Ice (enough to keep things cold during the soak)
- White vinegar (2 cups)
- Apple cider vinegar (1 cup, for a softer, rounder tang)
- Sugar (2 cups, adjust a little if you like less sweet)
- Mustard seeds (1 tablespoon)
- Celery seeds (1 teaspoon)
- Ground turmeric (1 teaspoon, for that classic color)
- Whole cloves (6 to 8, optional but very old fashioned)
- Jars and lids (pint jars work great)
- Large pot (for the water bath if you are canning)
- Jar lifter or tongs (please do not try to wing it with a fork)
One little note from my own kitchen: if your cucumbers are huge and seedy, these will still taste fine, but you lose that signature crunch. Smaller cucumbers are your best friend here.
Why this Recipe Works
I have tried a few versions over the years, and I always come back to this one because it hits the right balance. It tastes like the pickles I grew up grabbing from the relish tray at family cookouts. Sweet but not candy sweet, tangy but not harsh, and bright with just enough spice.
Here is what makes it reliable, even if you are new to pickles:
The cold salt soak pulls out extra water from the cucumbers and helps them stay crisp. It also lightly seasons them all the way through. Then you rinse, so you are not stuck with overly salty pickles.
Two vinegars sounds fussy, but it is really not. White vinegar brings the sharp pickle punch. Apple cider vinegar adds a softer, slightly fruity note that keeps the brine from tasting flat.
Turmeric, mustard seed, and celery seed are the classic trio. You can smell them as soon as the brine warms up, and it instantly feels like you are making something traditional.
If you are wondering about safety, the vinegar and water bath method are what make these shelf stable when canned properly. I follow tested ratios and keep it simple so you can feel confident.
“I made these last weekend and opened a jar two days later because I could not wait. They were crunchy and tasted like the pickles my grandma used to buy. I am already making a second batch.”
How to Make and Can Bread and Butter Pickles
This is the part that looks intimidating until you do it once. Then you realize it is basically slicing, soaking, simmering brine, and packing jars. Put on some music, clear a little counter space, and you are good.
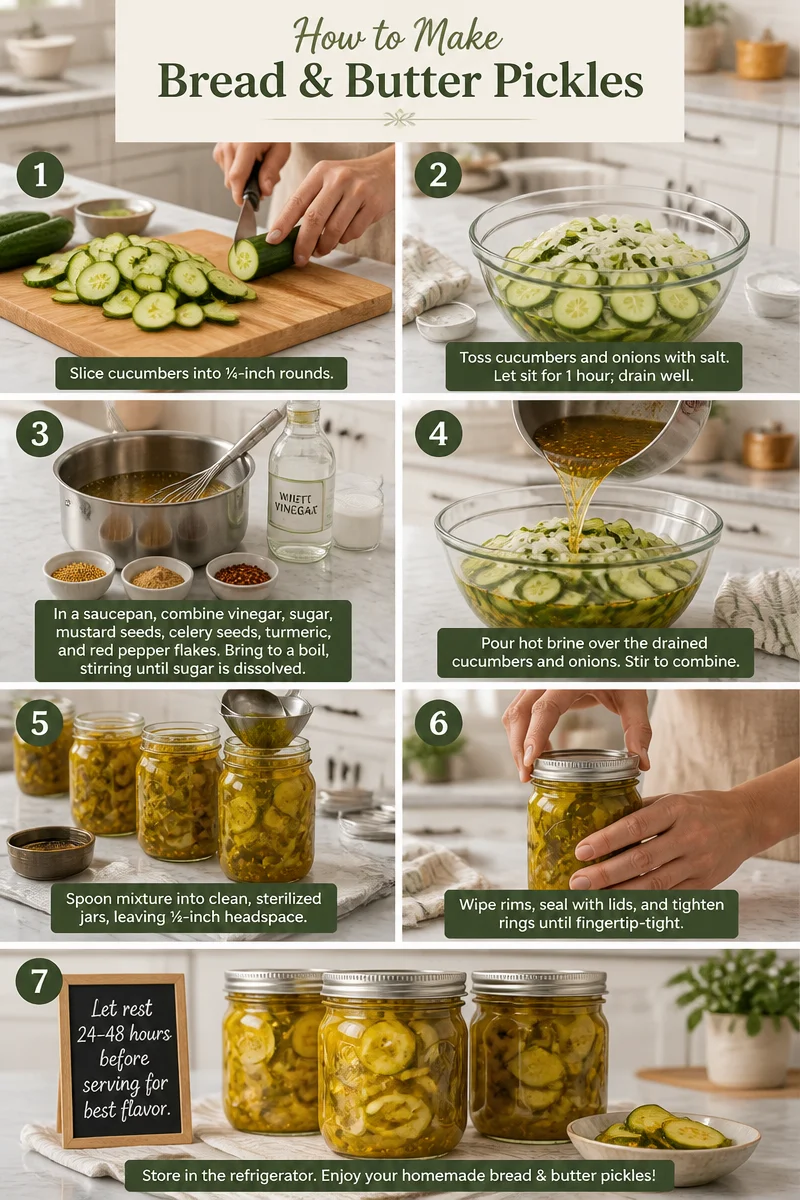
Step 1: Slice and soak. Slice cucumbers into 1/8 to 1/4 inch rounds. Slice onions thin. Toss them in a big bowl with the kosher salt, then cover with ice. Add a little cold water if needed so everything is nestled in. Let it sit for 2 hours.
Step 2: Rinse and drain. Drain the cucumber and onion mix in a colander, then rinse well with cold water. Let it drain for a few minutes. You want it wet but not dripping like crazy.
Step 3: Make the brine. In a large pot, add white vinegar, apple cider vinegar, sugar, mustard seeds, celery seeds, turmeric, and cloves if using. Bring it to a gentle boil, stirring so the sugar dissolves.
Step 4: Warm the vegetables in the brine. Add the drained cucumbers and onions to the pot. Stir and bring it back just until it starts bubbling again. Do not cook it forever. About 1 to 2 minutes is enough. This helps everything heat evenly for jarring.
Step 5: Pack the jars. Spoon the cucumber and onion mix into hot, clean jars, leaving about 1/2 inch of space at the top. Ladle brine over the top, covering everything, and keep that same headspace. Wipe jar rims clean, then add lids and screw bands until fingertip tight.
Step 6: Water bath can. Put jars in a canning pot with simmering water. Make sure jars are covered by at least 1 inch of water. Bring to a steady boil and process for 10 minutes (adjust for altitude if needed). Turn off heat, let jars sit 5 minutes, then lift them out and place on a towel.
Step 7: Let them seal and rest. After 12 to 24 hours, check that the lids are sealed (they should not flex up and down). Store sealed jars in a cool, dark place. For best flavor, wait at least 1 week before eating, though I know that is hard.
Quick reality check: if a jar does not seal, pop it in the fridge and eat it first. It is still totally good, just not pantry stable.
Tips for Making and Canning Bread and Butter Pickles
This is where the little details make a big difference. These are the things I wish someone had told me the first time I made Classic Old Fashioned Bread and Butter Pickles.
Use fresh cucumbers. If they are bendy or wrinkly, you will not get that snap. The crunch starts with the produce.
Do not skip the ice soak. It feels like an annoying extra step, but it really helps. The salt and cold combo is the crunch insurance policy.
Slice evenly. If some slices are paper thin and others are thick, the texture will be inconsistent. I aim for about the thickness of a nickel.
Keep jars hot. You do not want to pour hot brine into a cold jar. I keep my jars in hot water until I am ready to fill them. This also helps prevent breakage.
Headspace matters. Leaving about 1/2 inch at the top is not just a random rule. It helps the jars seal correctly during processing.
Altitude note. If you live at a higher altitude, you usually need a longer processing time. If you are not sure, look up a reliable altitude chart for water bath canning. It is worth the quick check.
And one more thing: if you want them a little less sweet, you can reduce the sugar by about 1/4 cup. I would not reduce too much, because the balance is part of what makes these taste like true Classic Old Fashioned Bread and Butter Pickles.
Recipe FAQs
Here are the questions I get the most when I share Classic Old Fashioned Bread and Butter Pickles with friends, neighbors, and anyone who “just happens” to stop by when jars are cooling on my counter.
Common questions
Q: How long do they need to sit before eating?
A: They are pretty decent after 24 to 48 hours in the fridge, but the flavor is best after 1 week. The spices mellow and the brine really settles in.
Q: Can I make them without canning?
A: Yes. Just pack them into clean jars, cover with hot brine, cool, and refrigerate. They will keep in the fridge for about 1 month, usually longer if you use clean utensils.
Q: Why are my pickles soft?
A: Most of the time it is older cucumbers, skipping the ice soak, or cooking them too long in the brine. Keep the heat time short and start with firm cucumbers.
Q: Can I use regular table salt?
A: You can, but it may have anti caking agents that can make the brine look cloudy. Kosher salt or pickling salt keeps things clearer.
Q: Can I add other spices?
A: Totally. A pinch of red pepper flakes is great if you want a little heat. Just do not go wild the first time. Make the classic version first, then tweak the next batch.
A jar worth making again and again
If you have been wanting to try pickling but kept putting it off, this is your sign. Classic Old Fashioned Bread and Butter Pickles are sweet, tangy, and crunchy in a way that store bought ones rarely match. Once you have a few jars lined up, you will start finding excuses to add them to everything. Make a batch, let them rest a bit, and then enjoy that first crunchy bite. If you try them, I hope they become one of your “I always keep these around” recipes too.