Easy No Bake Chocolate Oatmeal Peanut Butter Bars are my go to fix for those moments when you want something sweet right now, but you do not want to turn on the oven or wash a mountain of dishes. You know the vibe, it is late afternoon, you are craving chocolate, and you are trying to talk yourself out of ordering dessert. These bars have saved me so many times, especially on busy weeks when my brain is done making decisions. They taste rich and cozy like a candy bar, but they are made from simple pantry stuff. If you have oats, peanut butter, and cocoa, you are already halfway there. 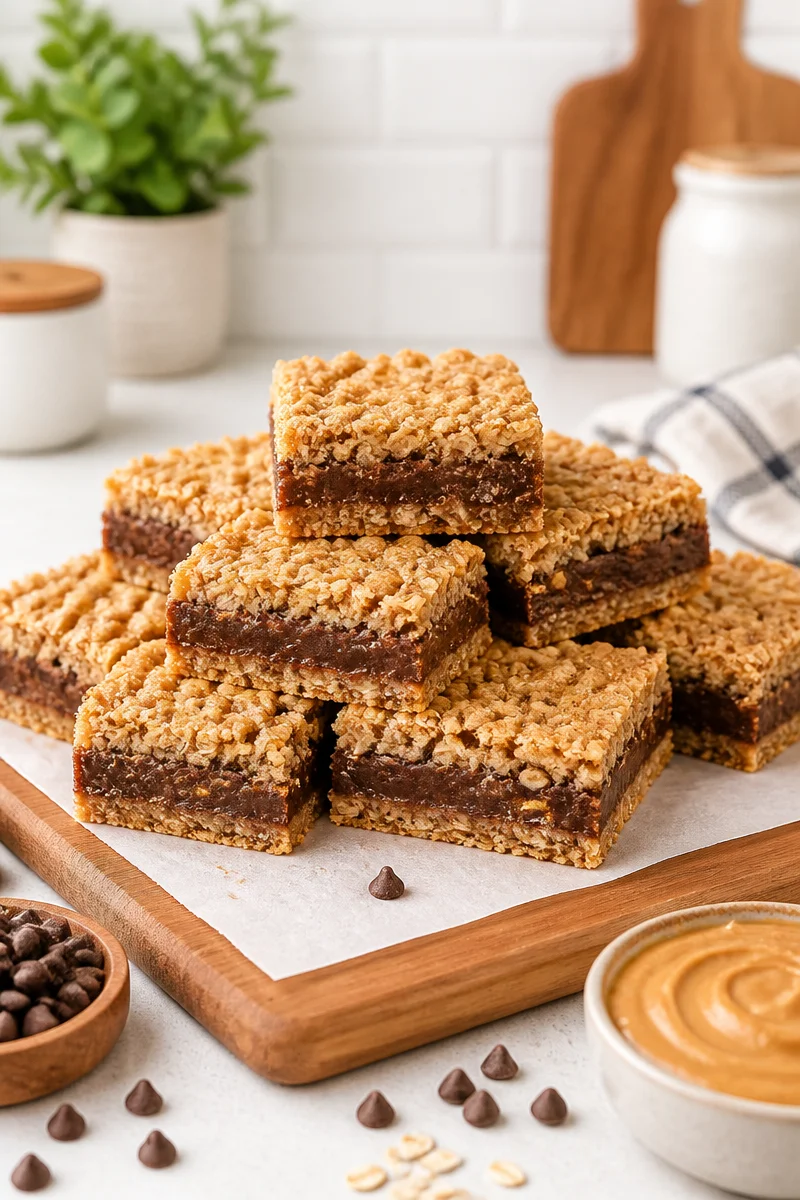
Why We Love These Chocolate Oatmeal Bars
First, they are truly no bake. That means no preheating, no guessing if the center is cooked, no waiting for the oven to cool down the kitchen. I love recipes like this in summer, but honestly I make them year round because they are just easy.
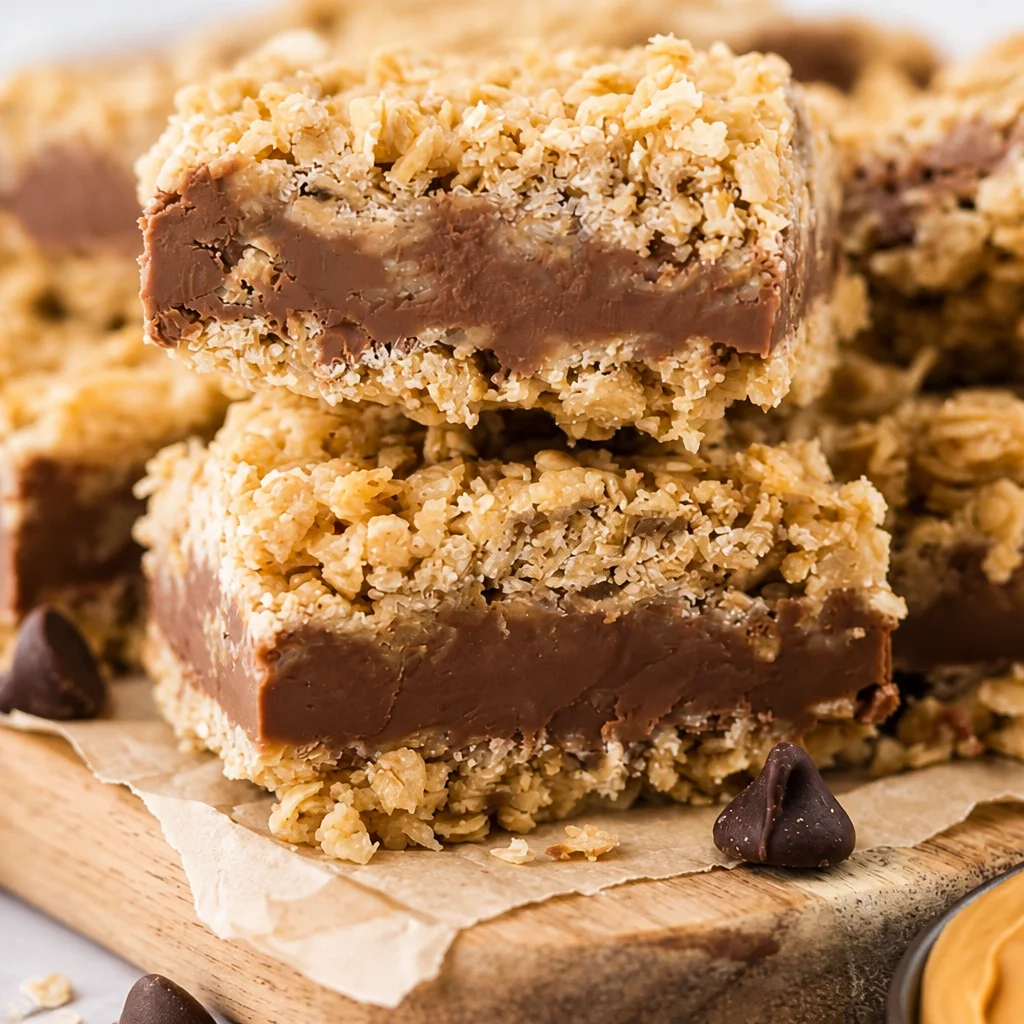
Second, the texture is so satisfying. The oat layer is chewy and a little sturdy, the chocolate layer is smooth, and the peanut butter brings that salty creamy thing that makes you go back for another bite. If you chill them long enough, you get clean slices that feel like a real treat.
Third, this is one of those recipes that is super forgiving. If your oats are a little more chunky, still good. If you like extra chocolate, nobody is going to complain. And if you are making a dessert for a crowd, these travel well and do not fall apart like some frosted bars do.
Also, I have made these for neighbors, potlucks, and that random Tuesday when a friend drops by. People always ask for the recipe, and I always feel a little smug because it is barely any effort.
“I made these on a Sunday night for my kids lunches and they were gone by Tuesday. My husband kept sneaking pieces from the fridge. Making another batch this weekend.”
Ingredient Notes
This is a simple pantry recipe, but a few small choices make a big difference. Here is what I use and why.
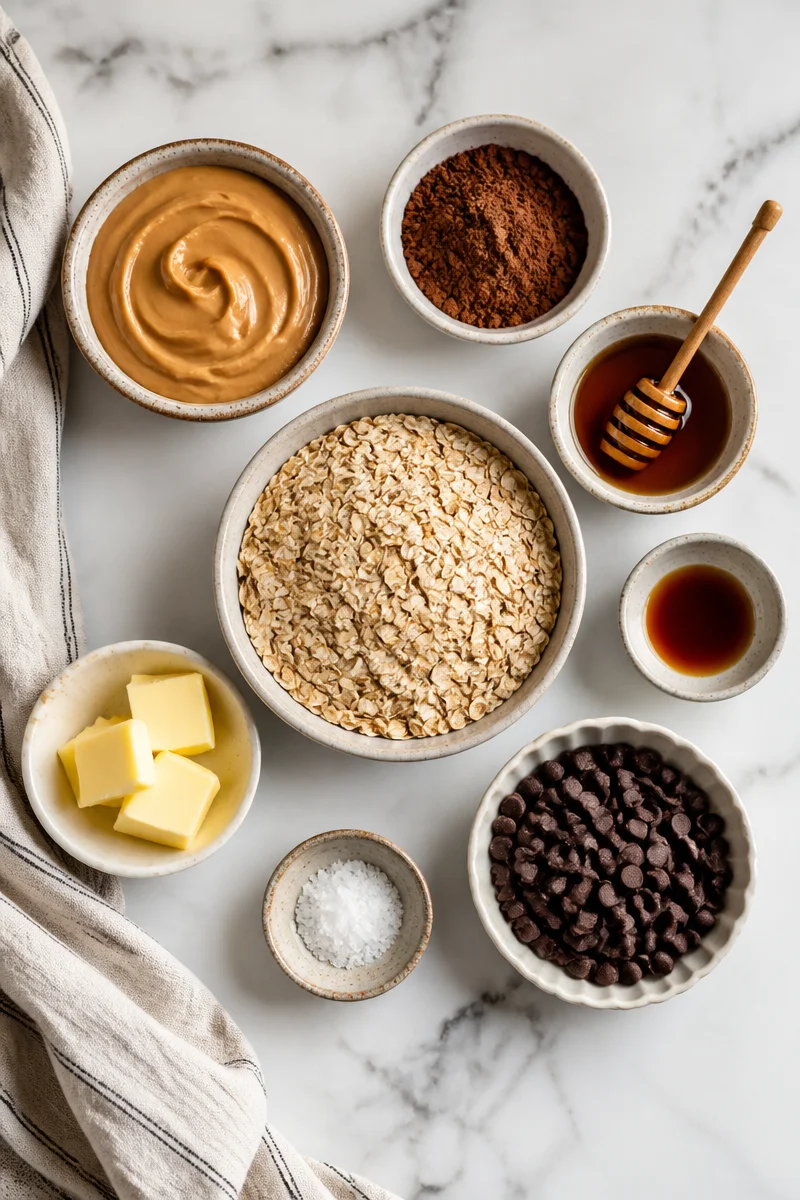
The basics you will need
- Old fashioned oats: These give you the best chewy texture. Quick oats can work, but the bars end up softer and a bit more dense.
- Peanut butter: Regular creamy peanut butter is easiest. Natural peanut butter can work, but it sometimes separates and makes the mixture a little oily.
- Cocoa powder: Unsweetened cocoa gives a deep chocolate flavor without making things too sweet.
- Honey or maple syrup: This helps bind and sweeten. Honey sets a bit firmer for me, maple syrup keeps it slightly softer.
- Butter: Adds richness and helps everything melt together smoothly.
- Chocolate chips: Semi sweet is my favorite here because the base is already sweet.
- Vanilla and salt: Small but important. Salt makes the chocolate taste bigger and better.
If you want to make them a little more dessert like, you can toss a handful of mini chocolate chips into the oat layer too. If you want them less sweet, use dark chocolate chips and go a touch lighter on the honey or syrup.
One more note on oats: if you are cooking for someone who needs gluten free, make sure your oats are labeled gluten free. Oats are naturally gluten free, but they can be processed near wheat.
Step-by-Step Instructions
These are the kind of bars you can make while half listening to a podcast. Just give yourself a little chill time so they set properly.
How to make them without stress
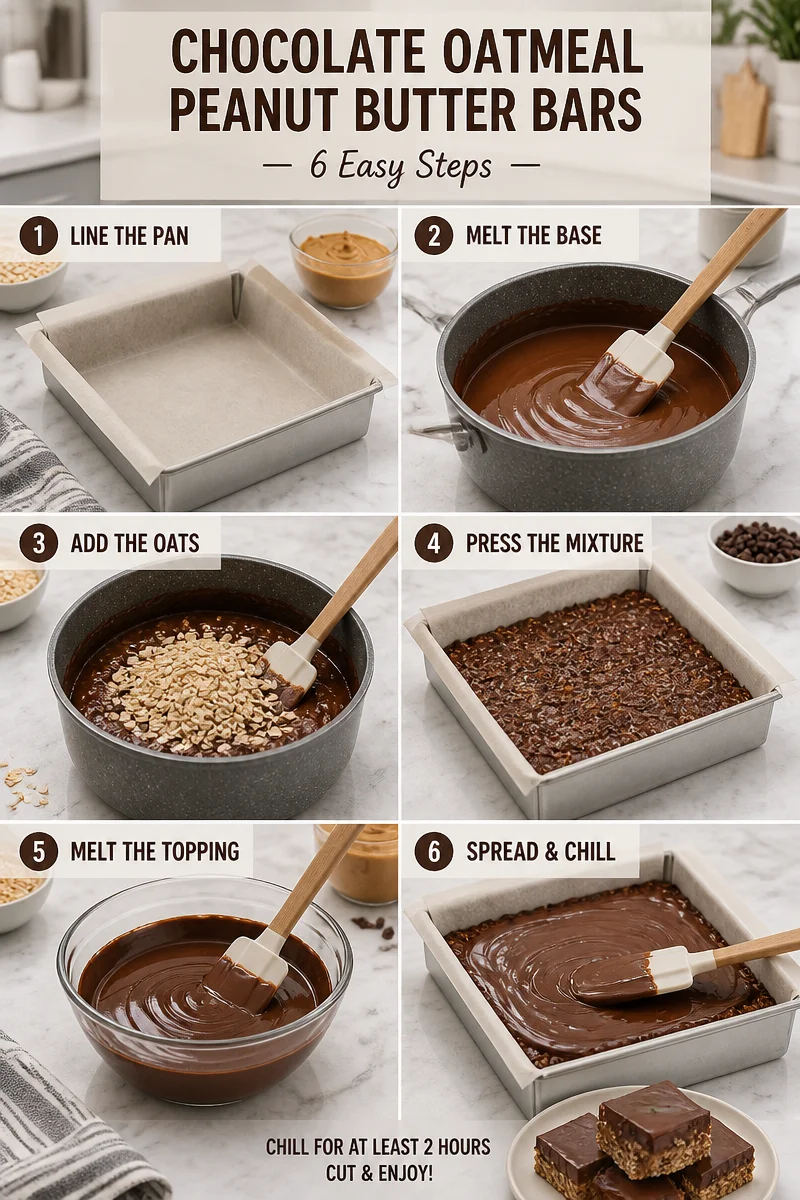
- Line your pan: Grab an 8×8 or 9×9 pan and line it with parchment paper. Leave a little overhang so you can lift the bars out later.
- Melt the base: In a medium pot over low heat, add butter, peanut butter, honey or maple syrup, cocoa powder, vanilla, and a pinch of salt. Stir until smooth and glossy.
- Add the oats: Turn off the heat and stir in the oats. Mix until every oat looks coated and chocolatey.
- Press into the pan: Scoop the mixture into your lined pan and press it down firmly. I use the back of a spoon, and then my clean hands to really pack it in.
- Melt the topping: Melt chocolate chips with a spoonful of peanut butter. You can do this in the microwave in short bursts, stirring often, or in a small pot on low heat.
- Spread and chill: Pour the chocolate layer over the oats and spread it out. Chill in the fridge for at least 1 to 2 hours, then slice.
When you slice, use a sharp knife. If the chocolate top is too firm and cracks, let the pan sit out for 5 to 10 minutes, then cut. That little wait makes a huge difference.
Recipe Tips
These are the little things I learned after making Easy No Bake Chocolate Oatmeal Peanut Butter Bars a bunch of times, including one batch that I tried to rush and regretted.
Press the base firmly. This is not the time to be gentle. The tighter you pack the oat mixture, the better your bars hold together when you slice and pick them up.
Keep the heat low. You are not cooking anything, just melting and mixing. High heat can make the mixture look grainy, and it can also make the chocolate topping seize if you are not careful.
Do not skip the salt. Even if you are using salted peanut butter, a small pinch makes the chocolate pop. It balances the sweetness in a way that tastes more grown up.
Let them chill long enough. I know, waiting is annoying. But if you slice too early, the bars can bend and the topping can slide. I try to make them and forget about them for at least an hour.
Want clean slices? Wipe your knife between cuts. It sounds extra, but it keeps the top layer neat and pretty.
If you are making these for kids, you can cut them smaller so they feel like a fun snack. If you are making them for adults, bigger squares feel like a real dessert with coffee.
Freezing & Storage Instructions
One reason I keep coming back to Easy No Bake Chocolate Oatmeal Peanut Butter Bars is that they store like a dream. I can make a batch once and snack all week.
In the fridge: Store bars in an airtight container for up to 7 days. I like to put parchment paper between layers so the tops stay nice.
At room temp: They can sit out for a few hours if you are serving them at a party, but I would not leave them out all day. The chocolate top gets soft, especially if your kitchen is warm.
In the freezer: Freeze sliced bars in a freezer safe container for up to 2 months. Separate layers with parchment paper. When you want one, let it sit at room temp for about 10 to 15 minutes, or eat it cold if you like a firmer bite.
My personal habit is to freeze half the batch. It stops me from eating them all in two days, and it means I always have a sweet treat ready for surprise company.
Common Questions
1. Can I use quick oats instead of old fashioned?
Yes. The bars will be softer and a little less chewy, but they will still hold together if you press the base firmly and chill well.
2. Can I make these without peanut butter?
You can swap in almond butter or sunflower seed butter. Just know the flavor will change, and some seed butters can be a bit softer, so chilling time matters.
3. Why is my chocolate topping cracking when I cut?
It is usually too cold. Let the bars sit out for 5 to 10 minutes before slicing, and use a sharp knife. Wiping the knife between cuts helps too.
4. Can I reduce the sweetness?
Totally. Use dark chocolate chips and slightly reduce the honey or maple syrup. You still need enough sticky sweetener to help bind the oats.
5. Do these count as a snack or a dessert?
Both, depending on your mood. I eat a small square as a snack, and a bigger one as dessert. No judgment either way.
A Sweet Little Treat You Will Actually Make Again
If you want something easy, chocolatey, and satisfying, these bars are a solid win. Easy No Bake Chocolate Oatmeal Peanut Butter Bars come together fast, use simple ingredients, and taste like you put in way more effort than you did. Keep them in the fridge for a quick grab and go bite, or freeze some for later and thank yourself next week. If you make them, slice one for a friend too, it is the kind of treat that makes people smile.
Chocolate Oatmeal Peanut Butter Bars
Ingredients
Method
- Line an 8x8 or 9x9 pan with parchment paper, leaving overhang for easy removal later.
- In a medium pot over low heat, add butter, peanut butter, honey (or maple syrup), cocoa powder, vanilla, and a pinch of salt. Stir until smooth and glossy.
- Turn off the heat and stir in the oats until fully coated.
- Press the mixture firmly into the prepared pan using the back of a spoon and then your hands for compacting.
- Melt the chocolate chips with a spoonful of peanut butter in the microwave or on low heat until smooth.
- Spread the melted chocolate over the oat layer and chill in the fridge for at least 1 to 2 hours.
- Slice using a sharp knife; if the chocolate is too firm, let the pan sit out for a few minutes before cutting.