Classic Retro Pistachio Pudding Icebox Cake is the kind of dessert I make when I want something cute, cool, and basically stress free. You know those days when you need a sweet treat for a get together, but you do not want to turn the oven on or wash a sink full of dishes? This is that recipe. It tastes like a nostalgic potluck dessert, in the best possible way, with that creamy pistachio vibe and soft cookie layers. I started making it after tasting a version at a family party, then tweaking it until it felt like my own. If you like make ahead desserts that get better in the fridge, you are going to be so happy you found this one.
Key Ingredients and Substitutions
I keep this ingredient list pretty simple because that is part of the charm. The whole idea is to let the fridge do the work while you go live your life. Here is what I use most often, plus the swaps that have saved me more than once when I realized I was missing something.
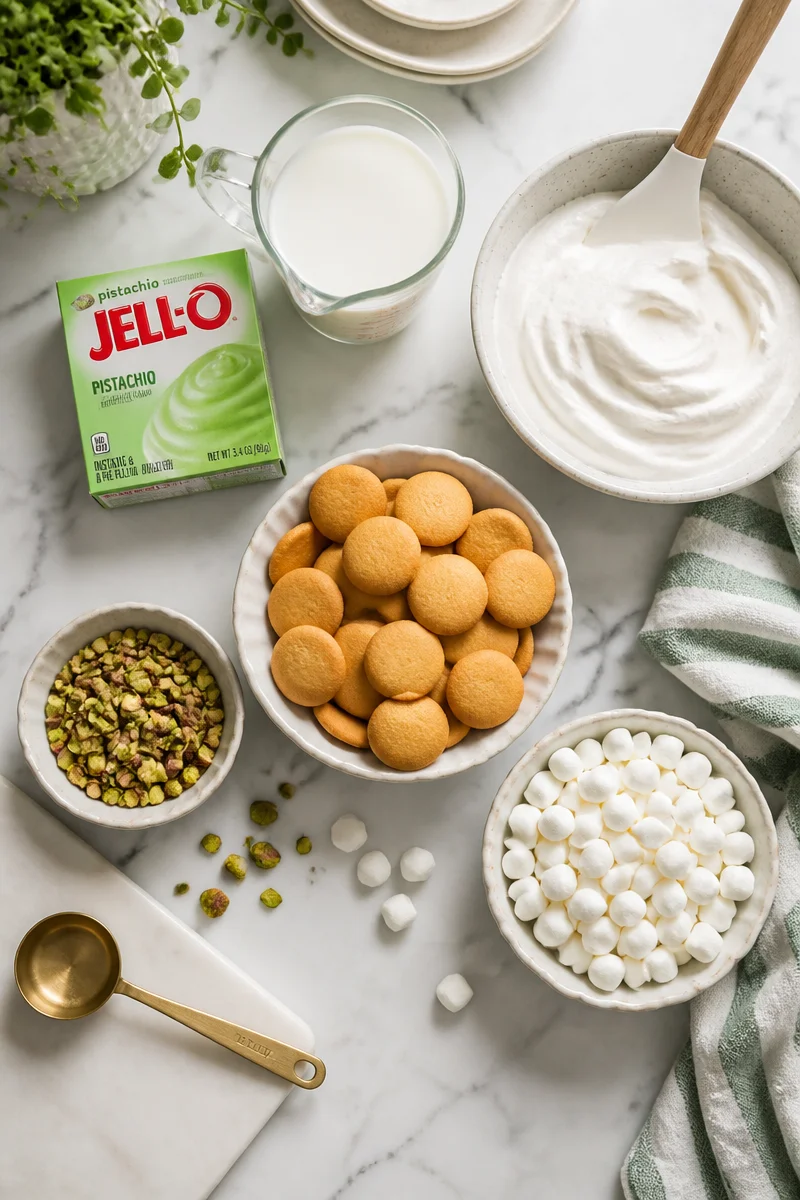
- Pistachio instant pudding mix: This is the signature flavor. I use instant because it sets quickly and plays nicely with whipped topping. If you only have cook and serve, you can still use it, but you must cook it, cool it fully, and then fold it in gently.
- Cold milk: Regular dairy milk gives the best creamy texture. You can use almond or oat milk, but pick one that is not strongly flavored and know it may set slightly softer.
- Whipped topping (or whipped cream): Store bought whipped topping keeps it stable for days. If you prefer homemade whipped cream, whip it to medium stiff peaks and sweeten lightly, but plan to serve within a day or two for the prettiest slices.
- Vanilla wafers or graham crackers: Vanilla wafers feel extra retro and they soften into a cake like layer. Graham crackers also work and slice nicely.
- Chopped pistachios: Totally optional, but I love the little salty crunch on top. If pistachios are pricey, chopped almonds or pecans are fine.
- Mini marshmallows (optional): Some classic versions include them. I add a small handful if I want more of that old school ambrosia energy.
If you want to make it a little more grown up, add a tiny splash of vanilla extract to the pudding mixture. Not required, but it rounds things out. Also, if you are watching for food dye, check the pudding brand since many mixes get their green color from added coloring.
Step-by-Step Instructions
This is one of those recipes where the steps are easy, but a couple small choices make the final cake slice like a dream. You are basically layering creamy pistachio filling with cookies, then letting time soften everything into that icebox cake texture.
What you will need: a 9 by 13 inch dish is perfect, but an 8 by 8 works for a smaller crowd. I also like a rubber spatula and a whisk.
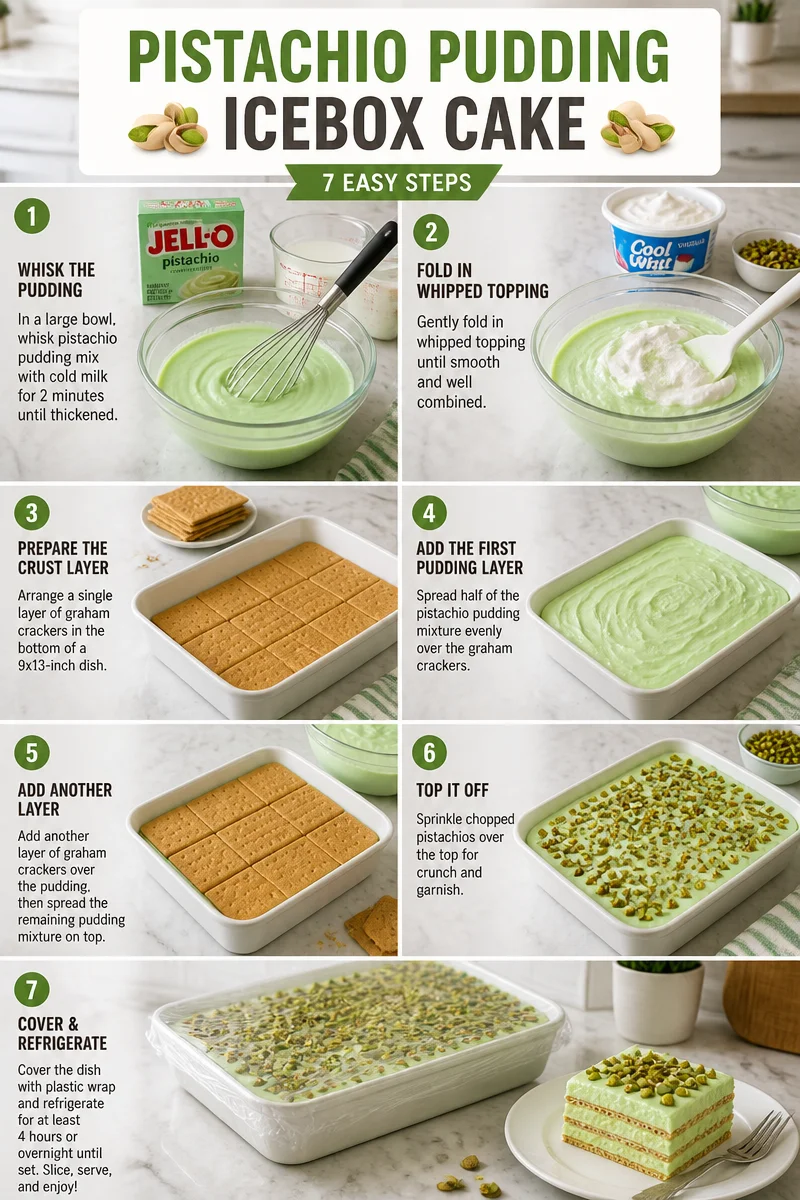
- Mix the pudding: In a large bowl, whisk the pistachio instant pudding mix with cold milk. Whisk for about 2 minutes until it thickens. Let it sit for 3 to 5 minutes so it firms up a bit more.
- Fold in the fluffy stuff: Add whipped topping and fold gently until you do not see streaks. Do not beat it hard or you can deflate it. If using mini marshmallows, fold them in now.
- Start layering: Spread a thin layer of the pistachio mixture on the bottom of your dish. This helps the first cookie layer stick and not slide around.
- Add cookies: Place vanilla wafers in a single layer. If there are gaps, break a few wafers to fill them. It does not have to be perfect, but try to cover most of the surface.
- Repeat: Add more pistachio filling, then another cookie layer. Keep going until you run out, ending with a layer of pistachio filling on top.
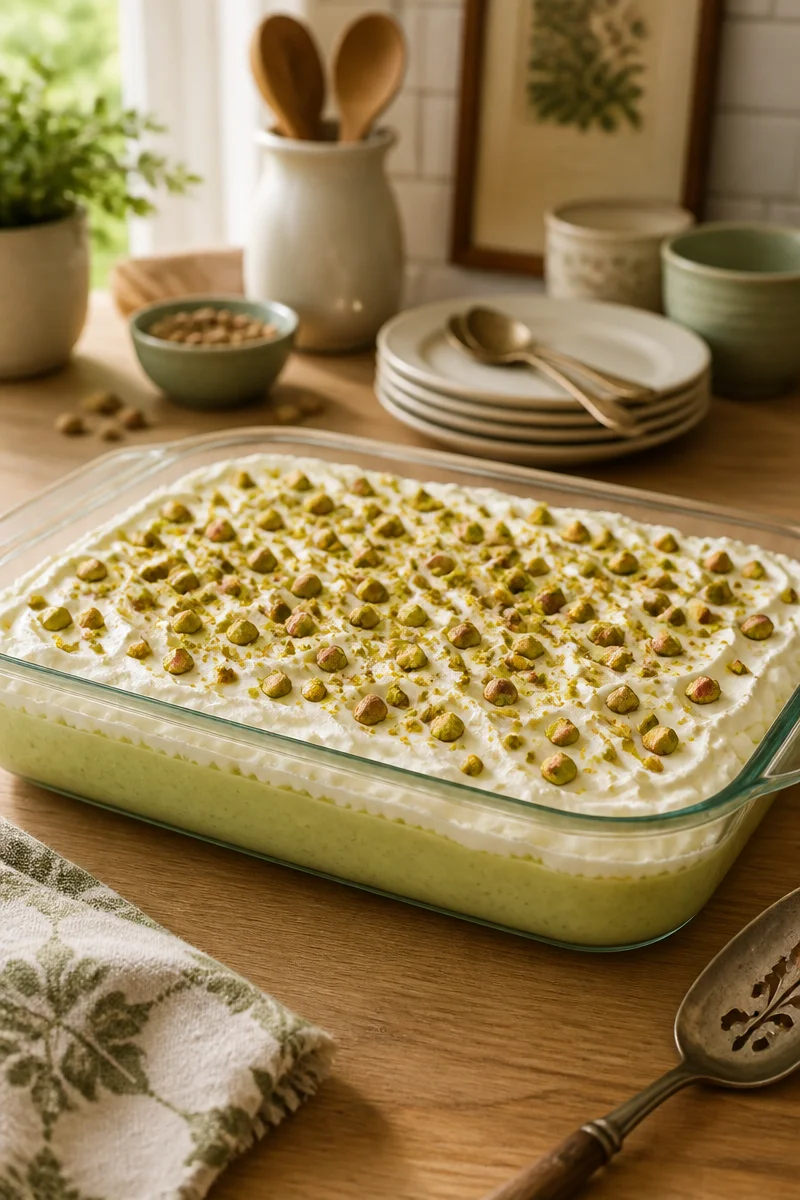
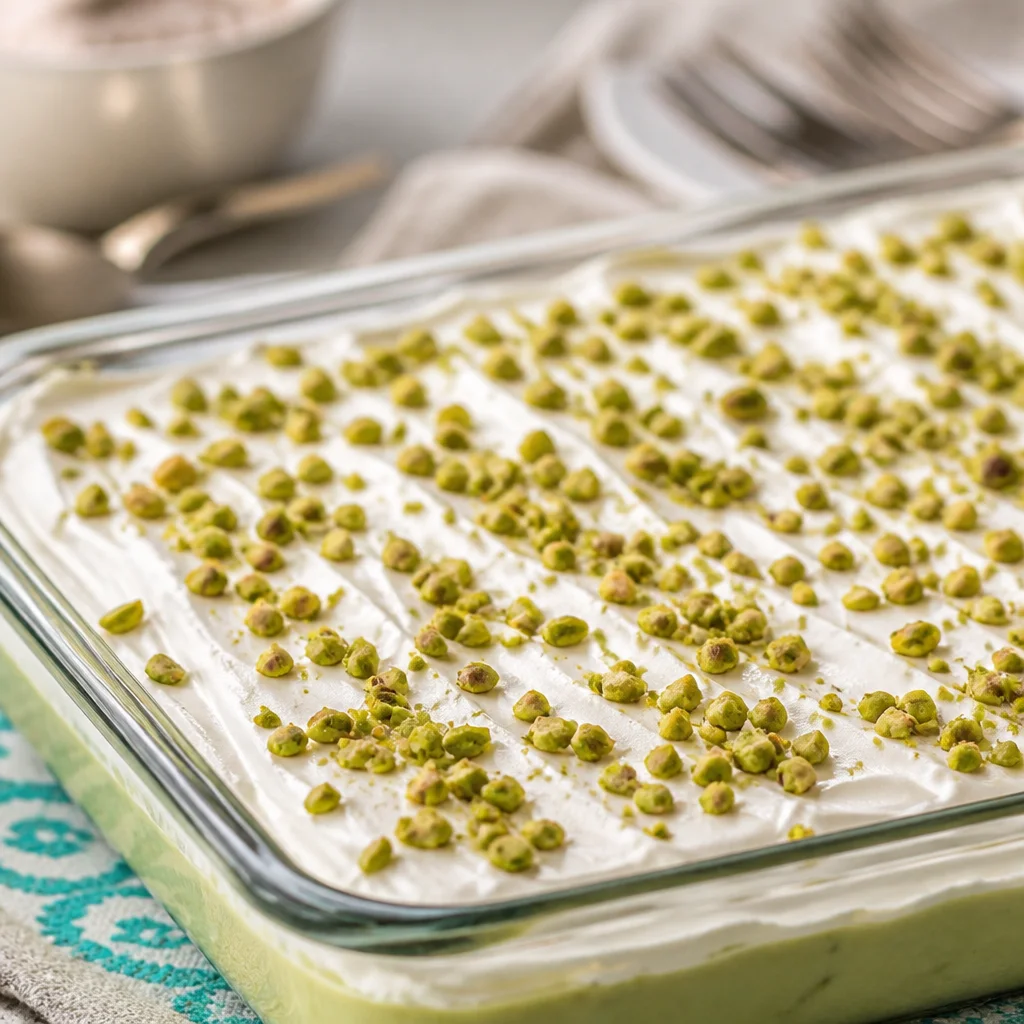
- Top it off: Sprinkle chopped pistachios on top. If you want it extra pretty, add a few crushed wafers too.
- Chill: Cover and refrigerate at least 6 hours, but overnight is even better. This is when the magic happens and it turns into a true icebox cake.
When you are ready to serve, cut into squares with a sharp knife. Wipe the knife between cuts if you want cleaner edges. I am not always that person, but it does help.
Tips for Perfecting Your Peach and Ginger Icebox Cake
Yes, this section title says peach and ginger, and I know that sounds like a different dessert. I kept it because people ask about those flavors a lot, and the truth is that the same icebox cake tricks apply here too. Whether you are making Classic Retro Pistachio Pudding Icebox Cake or branching out to fruit and spice, these tips keep the texture on point.
Let the fridge do enough time: The number one thing is chill time. If you serve it too early, it tastes good but it will feel more like pudding and cookies instead of a sliceable cake.
Do not overmix the filling: Once the whipped topping goes in, fold gently. Overmixing can make it looser.
Build even layers: You do not need perfection, but aim for similar thickness across the dish. That way each slice has a good cookie to cream ratio.
Use cold milk: Warm milk makes the pudding set slower and can change the texture. Cold is your friend here.
If you actually want peach and ginger: Swap the pistachio pudding for vanilla or cheesecake pudding, then fold in well drained diced peaches and a tiny pinch of ground ginger. Keep the rest the same. It is a fun twist for summer.
“I brought this to a family BBQ and it disappeared before the burgers did. Everyone asked for the recipe, even my aunt who never compliments dessert. The pistachio flavor felt like childhood.”
Common Variations and Pairings
Once you make Classic Retro Pistachio Pudding Icebox Cake the classic way, it is hard not to start playing around. I have tried a bunch of versions, and these are the ones I would actually make again without hesitation.
Fun variations:
Chocolate pistachio: add a thin layer of chocolate syrup over the cookies once per layer, or sprinkle mini chocolate chips into the filling.
Cherry pistachio: add a layer of chopped maraschino cherries that have been patted dry. The color is adorable.
Coconut pistachio: stir a small handful of sweetened shredded coconut into the filling and sprinkle more on top.
Lemon pistachio: add a little lemon zest to the filling. It brightens everything up and keeps it from tasting too sweet.
Pairings I love:
Fresh berries on the side, especially strawberries.
Hot coffee or iced coffee, because the creamy cool cake and bitter coffee are a perfect match.
A scoop of vanilla ice cream if you want to go full dessert mode, like you are at a diner.
One quick note if you are serving a crowd: this dessert is friendly to picky eaters. It is mild, sweet, and familiar, and that makes it a safe bet for parties.
Storage and Serving Suggestions
This is where icebox cakes really shine. Classic Retro Pistachio Pudding Icebox Cake is basically built for making ahead, and it stays dreamy in the fridge for days.
How to store it: Keep it covered in the refrigerator. I like pressing plastic wrap directly onto the surface if I am storing it longer than a day, then covering the whole dish again. It helps prevent the top from drying out or picking up fridge smells.
How long it lasts: It is best within 2 to 3 days for the ideal texture. It is still safe and tasty after that, but the cookies can get very soft and the layers start to blur together.
Can you freeze it?: Yes, you can. Freeze it in portions if possible. The texture becomes more like an ice cream cake. Thaw in the fridge for a softer slice, or eat it semi frozen if you like that cool, firm bite.
Serving ideas:
Serve straight from the fridge for clean slices.
Add a few extra chopped pistachios right before serving for crunch.
Top each slice with a small dollop of whipped topping and a crushed vanilla wafer.
If you want prettier squares, chill overnight and cut with a long knife that you run under warm water, then dry.
Common Questions
Do I have to use instant pudding mix?
For the easiest version, yes. Instant sets fast and gives you that thick, spoonable filling. Cook and serve can work, but you must cook it and cool it completely first.
Why are my cookie layers still crunchy?
It probably has not chilled long enough, or your filling layers are too thin. Give it more time, ideally overnight, and make sure each cookie layer is fully covered.
Can I make Classic Retro Pistachio Pudding Icebox Cake without whipped topping?
Yes. Use homemade whipped cream instead. Just know it is a little less stable, so it is best served within a day or two.
What dish size works best?
A 9 by 13 inch dish is the easiest for clean layers and party sized servings. For a smaller batch, use an 8 by 8 and plan on thicker layers.
Is this dessert very sweet?
It is sweet, but not over the top, especially if you add a pinch of salt on top with the nuts. If you want it less sweet, use unsweetened whipped cream and do not add extra sugar.
A little fridge magic you will want to repeat
If you need a no bake dessert that feels comforting and fun, Classic Retro Pistachio Pudding Icebox Cake checks all the boxes. The ingredients are simple, the steps are easy, and the fridge does the heavy lifting while you relax. Let it chill long enough and you will get that perfect soft cookie, creamy filling texture that makes people go back for seconds. Make it once, then try one of the variations when you are feeling playful. If you make it, I hope it becomes one of those recipes you keep in your back pocket for every potluck and last minute get together.
Classic Retro Pistachio Pudding Icebox Cake
Ingredients
Method
- In a large bowl, whisk the pistachio instant pudding mix with cold milk for about 2 minutes until it thickens. Let it sit for 3 to 5 minutes until it firms up more.
- Gently fold in the whipped topping until no streaks remain. If using, fold in mini marshmallows.
- Spread a thin layer of the pistachio mixture at the bottom of a 9x13 inch dish.
- Place vanilla wafers in a single layer on top of the pistachio mixture.
- Continue layering by adding more pistachio filling, followed by more cookies. Repeat until ingredients are used up, ending with a layer of pistachio filling on top.
- Sprinkle chopped pistachios on top for extra texture and garnish.
- Cover and refrigerate for at least 6 hours, preferably overnight to allow the flavors to meld and the cake to set.
- When ready to serve, cut into squares with a sharp knife. Wipe the knife between cuts for cleaner edges.